


|
|
|
|
|
|
|
Installing Unit On Your Existing Toilet: Several of our units (SCS-6000, SCS-5000, SCS-1000 and SCS-CUSTOM) completely replace your existing seat - they have their own seats built into the unit. For these units, you remove the old seat, and the install the unit using the provided Mounting Bolts. All of our other units install under your existing toilet seat, or under a specialty toilet seat. For these units, you first remove the seat, install the unit, and install the seat you will use over the unit. The toilet seat holds the unit in place, on top of the toilet.
Electrical Hookups: Only our SCS-6000, SCS-5000, SCS-130 and SCS-CUSTOM require an electric hookup. 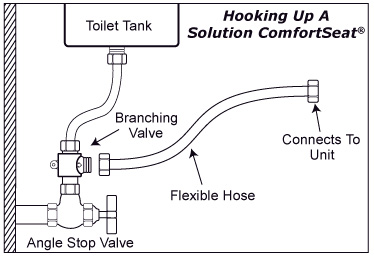 They have an approximately four foot long heavy-duty cord, with a three-prong grounded electrical plug, which must be plugged into a 110V ~ 120V North American standard three-prong grounded electrical outlet. If one isn't near the commode, a heavy-duty three-prong grounded 6 - 12 guage extension cord may be temporarily used. In many cases, an electrical outlet can be easily installed by a handyman or contractor near the toilet, branching off of the electrical conduit near most bathroom vanities or lighting fixtures in the opposite room. We recommend plugging our units into dedicated circuits, or circuits that have very few components installed on them. Running this unit on a circuit loaded with other components could result in malfunction of the unit, other components, tripping circuits, or lights flickering. Please consult an electrician if you have any concerns. The SCS-75 runs on a "AA" battery. The rest of our units do not require any electricity at all.
Water Hookups: All of our units us a simple 3-Way Branching Valve to supply fresh water to the unit. The 3-way "T" shaped branching valve either hooks up on the angle stop valve next to or behind the toilet, or the ballcock stem of your toilet tank (see illustration to the right). Electrical units then heat the cool water for use. The SCS-1000 and SCS-125 have optional hookups for hot water system usage, if you chose to use them. Instructions for hot-water hook-up, for these two units, are provided with the unit. Each unit comes with a very detailed and easy-to-follow set of installation instructions. An ablebodied person should be able to install these on a standard toilet, in 15 ~ 40 minutes, depending on the model. For those who do not want to install a unit themselves, the installation steps are simple enough that they do not require a plumber - a common handyman, or anyone physically able to reach behind the toilet and use an adjustable wrench and screwdriver, should suffice. If you have any questions, please don't hesitate to contact us online or call toll-free  for assistance. for assistance.
|
|
|